
Construction photographs that remain useful after the work is covered
A practical method for photographing location, condition and sequence, while preserving originals and the limits of photographic evidence.
A close-up of a pipe can be sharp, correctly exposed and almost useless six months later. Which pipe was it? On which floor? Was the photograph taken before or after the repair? Useful site photography combines images with enough context for someone who was not there to understand what they show.
Historic England's building-recording guidance treats photographs as part of a record alongside descriptions and drawings. Its heritage context is different from routine construction inspection, but the principle of planning a coherent record is transferable. Understanding Historic Buildings.
Start with the question the record must answer
A progress image, a defect record and a pre-covering inspection need different views. Before taking photographs, write the question: “Can another reviewer identify the waterproofing junction before it is concealed?” That is more useful than a target of twenty photographs per day.
Agree the locations, stages and responsibilities in advance. If the critical junction will disappear behind screed tomorrow, discovering the missing photograph next month is too late. Photographs support the required inspection and acceptance records; they do not replace tests, measurements or attendance that the project requires.
A worked example: a waterproofing junction
For a fictional bathroom at level 3, room 3.12, take a connected set while the area is safely accessible:
- A context view showing the room and recognisable doorway or grid position.
- A medium view showing the wall–floor junction and adjacent penetrations.
- A detail showing the relevant overlap or termination, with a suitable scale in the same plane where measurement is intended.
- A final view after the agreed remedial action, linked to the original observation.
Avoid allowing a ruler to hide the defect. Perspective can distort apparent dimensions, so do not extract precise measurements from an oblique image as though it were a surveyed drawing. If a measurement matters, record the instrument, reading and method separately.
The caption might say: “Room 3.12, east wall/floor junction, before screed, viewed towards the north; visible discontinuity at pipe penetration; inspection reference 018.” That records an observation. “Guaranteed leak” is a conclusion the image alone may not support.
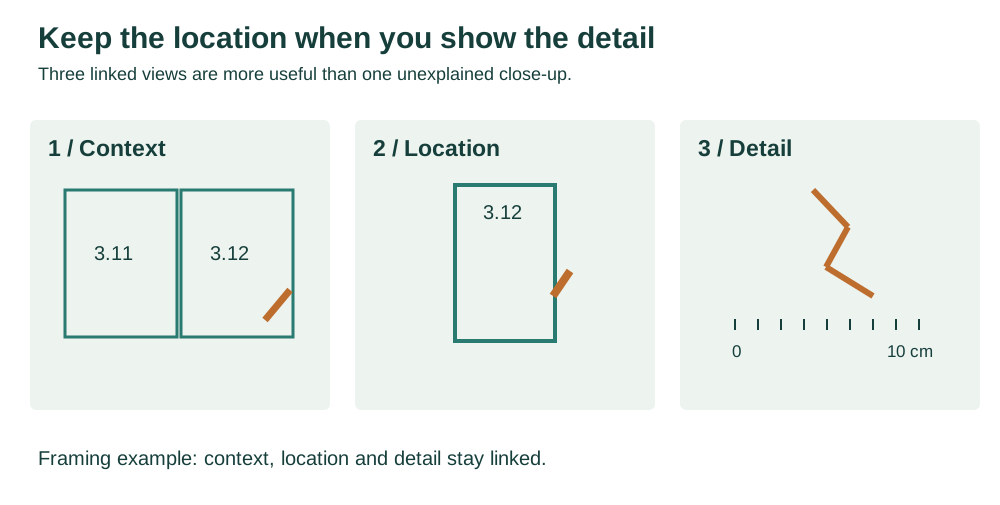
| Image | What it establishes | Link to keep |
|---|---|---|
| P-031 | Level 3 and room 3.12 | Location record + inspection date |
| P-032 | The junction within that room | P-031 |
| P-033 | Detail with a suitable scale, where needed | P-031 + P-032 |
Capture a small, consistent set of metadata
Record project, location, subject, author, capture date and time, relevant work stage, and the inspection or issue reference. A file identifier is helpful; a complicated naming code is optional. A register with readable captions often carries more meaning than a long filename.
Check the camera clock and time zone before the session. Preserve EXIF metadata when available, but do not treat it as independent proof: clocks can be wrong, metadata can change and messaging applications may remove it. Record when a date is estimated rather than silently presenting it as certain.
For repeat progress views, note the camera position and direction. A photograph from a different corner may appear to show dramatic progress simply because it excludes the unfinished area.
Preserve the original and make copies for explanation
Keep the original capture separately from cropped, annotated or compressed working copies. Link them through a stable identifier. A red arrow can clarify a detail, but the reviewer should be able to inspect the unmarked image and surrounding scene.
A checksum can help detect whether a file has changed since a recorded baseline. It cannot establish that the camera time was correct, that the scene was complete or that the image proves compliance. Access records and inspection documentation provide different kinds of evidence.
NARA's practical digitisation guidance also distinguishes preservation of originals, descriptive information and backed-up digital copies. NARA: Digitizing Family Papers and Photographs.
Review before leaving the location
Open the actual image, zoom in and check focus, glare, legibility of the scale and whether the context is recognisable. Confirm that the complete set reached the project record rather than remaining only on one phone. A thumbnail and a successful upload notification are insufficient checks for a crucial detail.
Use safe positions and authorised access. Avoid including unrelated people, personal documents or security information; control access to sensitive images and follow the project's retention rules. Where a redacted copy is needed, preserve the controlled original and identify the derivative.
Test whether the record works
Ask a colleague who was not present to find the junction, identify the work stage and explain what remains uncertain. If they cannot, improve the caption or context while the location is still available. At handover, test retrieval by room, asset and date—not only by the photographer's memory.
For choosing original and sharing formats, see JPEG, HEIC, PNG, TIFF and RAW.
Enable JavaScript to use reading progress and usefulness ratings.